Showing posts with label related posts. Show all posts

Monday, 10 February 2014

How to customize or edit the linkwithin related post widget

LinkWithin is a very popular widget that shows the related posts with a thumbnail and although it is not a new gadget among bloggers, many avoid using it for its lack of customization. So, in this post we will see how to add LinkWithin on a Blogger blog and how to customize it.

This is what we will do with this gadget:

- Change the location of the gadget;
- Remove the LinkWithin link;
- Change the "You might also like" title with any other text;
- Add rounded borders to images;
- Remove the border that separates posts;
- Add a background color;
- Change the background color on mouse over;
- Change the post titles color and font

Adding the LinkWithin gadget to Blogger

First of all we need to install the LinkWithin gadget - for this, we have to go to the LinkWithin homepage and type in the required information:

linkwithin gadget, related posts widget, blogger widgets
Although it gives the option to choose Blogger as a platform, we will select Other so that we'll be able to put the code directly into our template and then modify it. Select the number of posts (stories) according to the width of posts - if the width of the posts container is small, then it is recommended to display fewer related posts.

By clicking on the "Get widget!" button, we'll be given the code that we need use it. It should look something like this:
<script>
var linkwithin_site_id = XXXXXXX;
</script>
<script src="http://www.linkwithin.com/widget.js"></script>
<a href="http://www.linkwithin.com/"><img src="http://www.linkwithin.com/pixel.png" alt="Related Posts Plugin for WordPress, Blogger..." style="border: 0" /></a>
That's the basic code we need to copy. Now login into your Blogger account > select your blog to where you want to add the LinkWithin gadget and go to Template > click on the Edit HTML button:


Cick anywhere inside the code area and press the CTRL + F keys to search for the following line:
<div class='post-footer'>
Just above this line, paste the LinkWithin code.

By doing so you already have the LinkWithin gadget on your blog and the result will be like this:

linkwithin gadget, related posts widget, blogger widgets
Note: If you would like to show only in the individual post, you can enclose the code using a conditional.

Change the LinkWithin gadget location

You will notice that this widget will always appear right at the end of your posts. In the LinkWithin FAQ page we are explained how to fix this - simply add the code below where we want the widget to appear:
<div class='linkwithin_div'/>
This will make the gadget to display right where we added the code. Even if we don't want to change the gadget location, this line is required so that we can customize it later.

Replacing the "You might also like" text

By default, the LinkWithin gadget will have the title "You might also like" and we can change that text to anything we want. Just add the line below in blue within the LinkWithin code:
<div class='linkwithin_div'/>
<script>
var linkwithin_site_id = XXXXXXX;
</script>
<script>linkwithin_text='Related Posts:'</script>
<script src="http://www.linkwithin.com/widget.js"></script>
<a href="http://www.linkwithin.com/"><img src="http://www.linkwithin.com/pixel.png" alt="Related Posts Plugin for WordPress, Blogger..." style="border: 0" /></a>
Here you can change the text - in this case, it will say "Related posts" instead of "You may also like these stories".

Changing the LinkWithin background color and thumbnails style

Within the template's code, search for the ]]></b:skin> tag and just above it, add the following CSS styling:
.linkwithin_div {
background: #EEEEEE; /* Background color for the related posts container */
padding: 0 10px;
border-top: 1px solid #DBDBDB;  /* Top border for the related posts container */
border-bottom: 1px solid #DBDBDB;  /* Bottom border for the related posts container */
}
.linkwithin_text {
font-family: Cambria,Georgia,sans-serif;
font-size:18px; /* Size for the related posts title */
color:#898989; /* Color for the related posts title */
}
a#linkwithin_logolink_0, a#linkwithin_logolink_1, a#linkwithin_logolink_2, a#linkwithin_logolink_3, a#linkwithin_logolink_4, a#linkwithin_logolink_5, a#linkwithin_logolink_6, a#linkwithin_logolink_7, a#linkwithin_logolink_8, a#linkwithin_logolink_9, a#linkwithin_logolink_10, a#linkwithin_logolink_11, a#linkwithin_logolink_12, a#linkwithin_logolink_13, a#linkwithin_logolink_14, a#linkwithin_logolink_15, a#linkwithin_logolink_16, a#linkwithin_logolink_17, a#linkwithin_logolink_18, a#linkwithin_logolink_19, a#linkwithin_logolink_20 {
display:none;
}
.linkwithin_posts {
width: 500px !important; /* Width for the related posts container */
}
.linkwithin_posts a {
border: 0 !important;
padding-right: 10px !important;
}
.linkwithin_posts a:hover {
background: #F5F5F5 !important; /* Background color on mouseover */
}
.linkwithin_img_0 {
background: #F5F5F5;
border: 1px solid #C1C1C1;
padding: 2px !important;
transition:all .2s linear;
 -o-transition:all .5s linear;
-moz-transition:all .2s linear;
-webkit-transition:all .2s linear;
}
.linkwithin_img_0:hover {
background: #ffffff;
padding: 2px !important;
opacity:.6;
filter:alpha(opacity=60)
} 
.linkwithin_img_0 div, div.linkwithin_img_0,
.linkwithin_img_1 div, div.linkwithin_img_1,
.linkwithin_img_2 div, div.linkwithin_img_2,
.linkwithin_img_3 div, div.linkwithin_img_3,
.linkwithin_img_4 div, div.linkwithin_img_4,
.linkwithin_img_5 div, div.linkwithin_img_5,
.linkwithin_img_6 div, div.linkwithin_img_6,
.linkwithin_img_7 div, div.linkwithin_img_7,
.linkwithin_img_8 div, div.linkwithin_img_8,
.linkwithin_img_9 div, div.linkwithin_img_9,
.linkwithin_img_10 div, div.linkwithin_img_10,
.linkwithin_img_11 div, div.linkwithin_img_11,
.linkwithin_img_12 div, div.linkwithin_img_12,
.linkwithin_img_13 div, div.linkwithin_img_13,
.linkwithin_img_14 div, div.linkwithin_img_14,
.linkwithin_img_15 div, div.linkwithin_img_15,
.linkwithin_img_16 div, div.linkwithin_img_16,
.linkwithin_img_17 div, div.linkwithin_img_17,
.linkwithin_img_18 div, div.linkwithin_img_18,
.linkwithin_img_19 div, div.linkwithin_img_19,
.linkwithin_img_20 div, div.linkwithin_img_20 {
-webkit-border-radius: 100px;
-moz-border-radius: 100px;
border-radius: 100px;

}
.linkwithin_title {
color: #242424 !important; /* Color for titles */
font-family: Cambria,Georgia,sans-serif;
font-size: 12px !important; /* Font size of posts titles */
line-height: 24px !important;
text-align:center;
text-decoration: none;
}
.linkwithin_title:hover {
color: #000 !important; /* Color of posts titles on mouseover */
}
After adding this CSS, the LinkWithin gadget will look like this:

linkwithin gadget, related posts widget, blogger widgets

If you don't want rounded thumbnails, remove the code in red. In green you can see the parts which can be customized - there you can add more styles or change the background color, text size, etc.

After you've made the changes, click on the Save Template button and you're done. Enjoy!

Sunday, 31 March 2013

Related Posts Widget with Thumbnails and Summary for Blogger

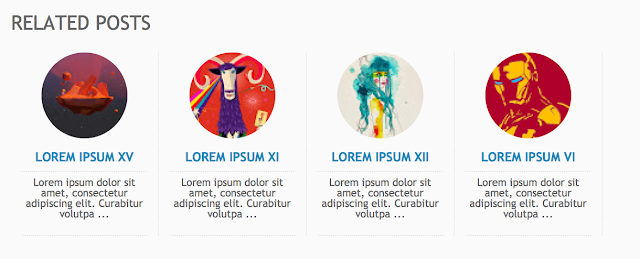
There are several tutorials quite old in which you have seen different methods for displaying related posts in Blogger like the related posts widget with thumbnails and simple related posts with post titles only. This tutorial, however, will show you how to implement a really awesome Related Posts widget with thumbnails and posts snippets that will appear in the footer of all your blog posts.

If you want to get an idea of how it looks like, please visit this demo blog.

Now let's see how to add the related posts widget with thumbnails and summary in Blogger:

Adding Related Posts Widget with Snippets to Blogger Posts


related posts widget with thumbnails and summaries

Step 1. From your Blogger Dashboard, go to Template and click on Edit HTML


Step 2. Click anywhere inside the code area and then press CTRL + F to open the Blogger search box


Step 3. Type or paste this tag inside the search box and hit enter to find it:
</head>
After you found it, paste this script just above it:
<script type='text/javascript'>
//<![CDATA[
var relatedTitles = new Array();
var relatedUrls = new Array();
var relatedpSummary = new Array();
var relatedThumb = new Array();
var relatedTitlesNum = 0;
var relatedPostsNum = 4; // number of entries to be shown
var relatedmaxnum = 75; // the number of characters of summary
var relatednoimage = "https://blogger.googleusercontent.com/img/b/R29vZ2xl/AVvXsEgBRnUsjq8e-CYWTQHaymshu4j2SB427t-NwBpVg_mDG8eBY_1if1A5gxky_-KB1XDnsnfb87twFjBg6J9aahsZaLxcaXhHJGHYNlaB5pJSPC4KsOw3pFTXke7G8fv7Lf21qxUNHEgropPA/s1600/no_image.jpg"; // default picture for entries with no image
function readpostlabels(e){for(var t,r,l,a=0;a<e.feed.entry.length&&(t=e.feed.entry[a],a!=e.feed.entry.length);a++){relatedTitles[relatedTitlesNum]=t.title.$t,l="","content"in t?l=t.content.$t:"summary"in t&&(l=t.summary.$t),relatedpSummary[relatedTitlesNum]=removetags(l,relatedmaxnum),r="media$thumbnail"in t?t.media$thumbnail.url:relatednoimage,relatedThumb[relatedTitlesNum]=r;for(var d=0;d<t.link.length;d++)if("alternate"==t.link[d].rel){relatedUrls[relatedTitlesNum]=t.link[d].href;break}relatedTitlesNum++}}function showrelated(){for(var e=new Array(0),t=new Array(0),r=new Array(0),l=new Array(0),a=0;a<relatedUrls.length;a++)contains(e,relatedUrls[a])||(e.length+=1,e[e.length-1]=relatedUrls[a],t.length+=1,t[t.length-1]=relatedTitles[a],r.length+=1,r[r.length-1]=relatedpSummary[a],l.length+=1,l[l.length-1]=relatedThumb[a]);relatedTitles=t,relatedUrls=e,relatedpSummary=r,relatedThumb=l;for(var a=0;a<relatedTitles.length;a++){var d=Math.floor((relatedTitles.length-1)*Math.random()),n=relatedTitles[a],s=relatedUrls[a],m=relatedpSummary[a],i=relatedThumb[a];relatedTitles[a]=relatedTitles[d],relatedUrls[a]=relatedUrls[d],relatedpSummary[a]=relatedpSummary[d],relatedThumb[a]=relatedThumb[d],relatedTitles[d]=n,relatedUrls[d]=s,relatedpSummary[d]=m,relatedThumb[d]=i}for(var u,h=0,o=Math.floor((relatedTitles.length-1)*Math.random()),g=o,f=document.URL;h<relatedPostsNum&&(relatedUrls[o]==f||(u="<div class='relatedsumposts'>",u+="<a href='"+relatedUrls[o]+"' title='"+relatedTitles[o]+"'><img src='"+relatedThumb[o]+"' /></a>",u+="<h6><a href='"+relatedUrls[o]+"' target='_self'>"+relatedTitles[o]+"</a></h6>",u+="<p>"+relatedpSummary[o]+" ... </p>",u+="</div>",document.write(u),h++,h!=relatedPostsNum))&&(o<relatedTitles.length-1?o++:o=0,o!=g););}function removetags(e,t){for(var r=e.split("<"),l=0;l<r.length;l++)-1!=r[l].indexOf(">")&&(r[l]=r[l].substring(r[l].indexOf(">")+1,r[l].length));return r=r.join(""),r=r.substring(0,t-1)}function contains(e,t){for(var r=0;r<e.length;r++)if(e[r]==t)return!0;return!1}
//]]>
</script>

Note:
- To change the number of posts that are being displayed, modify the value in red (4)
- To change the number of characters to be shown in posts summary, modify the value in green (75)
- To change the default pic for posts with no images, add your URL instead of the one marked in blue
Step 4. Now that we added the script, we will need to add the CSS style. Just paste the following code above the same </head> tag:
<style>
.relatedsumposts {
padding: 0px 10px;
text-align: center;
/* width of the related posts area */
width: 120px;
float:left;margin-bottom:15px;
border-right: 1px dotted #E5E5E5;
display: inline-block;
}
.relatedsumposts h6 {
margin: 5px 0;
}
.relatedsumposts h6 a {
/* link properties */
color: #linkcolor;
text-transform: uppercase;
font-size:12px;
}
.relatedsumposts img {
/* thumbnail properties */
height: 82px;
width: 82px;
-webkit-border-radius: 50%;
-moz-border-radius: 50%;
border-radius: 50%;

}
.relatedsumposts p {
/* summary properties */
border-top: 1px dotted #E5E5E5;
border-bottom: 1px dotted #E5E5E5;
color: #summarycolor;
font-size: 10px;
height: 4em;
line-height: 1;
margin: 5px 0 0;
padding: 5px 0 15px 0;
}
#relatedpostssum {
width: 100%;
}
.relatedpoststitle {
font-size: 19px;
margin-bottom:15px;
}
</style>

Customizing the Related Posts Widget:

- Modify the value in red (120px) to adjust the width of the widget area
- Replace #linkcolor with the hex value of your color to change the color of post titles
- If you want to change the size of thumbnails, modify the values marked in violet (82px)
- To determine the border roundness, modify the values in orange (50%)
- To change the color of the post snippet, change #summarycolor with color hex value

Step 5. Next, search (CTRL + F) for the following code snippet:
<b:includable id='postQuickEdit' var='post'>
When you find it, click the sideways arrow to expand the code and scroll down until you find </b:includable> - see the screenshot for more help:


Step 6. Just ABOVE the </b:includable> tag, add the following html code:
<!-- Related Posts with Thumbnails Code Start-->
<b:if cond='data:blog.pageType == &quot;item&quot;'>
<b:loop values='data:post.labels' var='label'>
<b:if cond='data:label.isLast != &quot;true&quot;'>
</b:if>
<script expr:src='&quot;/feeds/posts/default/-/&quot; + data:label.name + &quot;?alt=json-in-script&amp;callback=readpostlabels&amp;max-results=50&quot;' type='text/javascript'/>
</b:loop>
  <div class='post-footer-line post-footer-line-4'>
   <div class='relatedpoststitle'>RELATED POSTS</div>
<div id='relatedpostssum'>
      <script type='text/javascript'>showrelated();</script>
    </div>
    <div style='clear:both;'/>
  </div>
</b:if>
<!-- Related Posts with Thumbnails Code End-->
Screenshot

Step 7. Click on the "Save Template" button to save the changes and you're done!

Note: in case you see the 'undefined' message, make sure that you have added the appropriate labels to your posts - which can be found in at least one more post, otherwise the script might not be able to find any related posts for that entry.