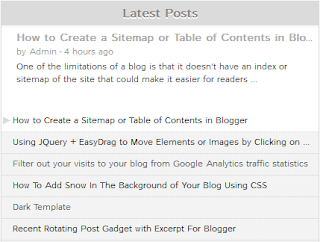
Before installing anything, let's see it in action to decide if it does what we want.
How to Add Recent Rotating Posts Widget to Blogger
Step 1. Go to Layout > click on Add a Gadget link.Step 2. From the pop-up window, choose the HTML/JavaScript gadget
Step 3. Paste this code inside the empty box:
<style>
.gfg-root {
width: 100%;
height : auto;
position : relative;
overflow : hidden;
margin: 0 auto;
text-align : center;
font-size: 12px;
border: 1px solid #DBDBDB;
}
.gfg-title {
font-size: 16px;
font-weight : bold;
color : #6B6B6B;
background:#F3F3F3;
background-repeat: repeat;
line-height : 1.4em;
overflow : hidden;
white-space : nowrap;
padding: 5px;
text-shadow: 0px 2px #fff;
}
.gfg-entry {
background-color: #FFFFFF;
width : 100%;
height : 9.2em;
position : relative;
overflow : hidden;
text-align : left;
margin-top : 3px;
}
.gf-title a {
text-transform: capitalize;
color: #0000ff;
font-size: 14px;
}
.gfg-subtitle {
display: none;
}
.gfg-list {
position : relative;
overflow : hidden;
text-align : left;
}
.gfg-listentry {
line-height : 1.5em;
overflow : hidden;
white-space : nowrap;
text-overflow : ellipsis;
padding-left : 15px;
padding-right : 5px;
}
.gfg-listentry-odd {
background-color : #F3F3F3;
border-bottom : 1px dotted #CCCCCC;
padding: 5px;
}
.gfg-listentry-even {
background-color : #F3F3F3;
border-bottom : 1px dotted #CCCCCC;
padding: 5px;
}
.gfg-listentry-odd a{
color: #595959;
padding: 0 0px 0 10px;
}
.gfg-listentry-even a{
color: #242424;
padding: 0 0px 0 10px;
}
.gfg-listentry-highlight {
background: #FFFFFF;
}
.gfg-listentry-highlight:before {
position: absolute;
left: 0;
content: '\25BA ';
font-size: 14px;
color: #DBDBDB;
}
.gfg-listentry-highlight a {
color: #242424;
}
.gfg-root .gfg-entry .gf-result {
position : relative;
background-color: #ffffff;
width : auto;
height : 100%;
padding-left : 20px;
padding-right : 5px;
}
.gfg-root .gfg-entry .gf-result .gf-title {
font-size: 14px;
line-height : 1.2em;
overflow : hidden;
white-space : nowrap;
text-overflow : ellipsis;
margin-bottom : 2px;
margin-top: 5px;
}
.gfg-root .gfg-entry .gf-result .gf-snippet {
height : 3.8em;
color: #000000;
margin-top : 3px;
}
.clearFloat {
clear : both;}</style>
<script src="http://www.google.com/jsapi" type="text/javascript"></script><script src="http://www.google.com/uds/solutions/dynamicfeed/gfdynamicfeedcontrol.js" type="text/javascript"></script>
<script type="text/javascript">
function showGadget() {var feeds = [{title:'List',url:'http://helplogger.blogspot.com/feeds/posts/default?redirect=false&start-index=1&max-results=10'},];
new GFdynamicFeedControl(feeds, 'feedGadget',{title: 'Latest Posts', numResults : 10, displayTime : 5000, hoverTime : 500});} google.load("feeds", "1");
google.setOnLoadCallback(showGadget);
</script>
<div id="feedGadget">Loading...</div>
Customizations:
The URL in blue is the feed. Obviously, the http://helplogger.blogspot.com URL should be replaced with the feed URL of your blog.Next is start-index=1. This number indicates which post will appear first on the list. By default, it is the latest post published on your blog, so if you want to begin displaying older posts, change the 1 value.
max-results=10 indicates the maximum number of posts that we will be reading from the feed, beginning from the one that we have set up before in the start-index=1. This number always needs to be equal or greater to what we should see later and what it does is to set the number of posts that will be shown in the gadget. The easiest way would be to put 500 in order not to fail, but the higher the number is, the longer the gadget will take to load, so it's better to adjust to what we need to show.
Finally, here are some other script parameters:
title: 'Latest Posts', is the widget's title that appears on top.
numResults: 10, number of posts that will show in the list
displayTime: 5000, the delay time between posts in the rotator (in milliseconds)
hoverTime: 500, minimum time for an item in the list to be displayed at the top.
If you want to hide the list and show only the posts, change this part:
.gfg-list {To:
position : relative;
overflow : hidden;
text-align : left;
}
.gfg-list {If you want to display only the list, change this:
display:none;
}
.gfg-entry {To:
background-color: #FFFFFF;
width : 100%;
height : 9.2em;
position : relative;
overflow : hidden;
text-align : left;
margin-top : 3px;
}
.gfg-entry {
display: none; }
Step 4. Save the gadget and you're done. Enjoy!


No comments:
Post a Comment